
 Yahoo Finance
 How to add and manage VPNs in iOS 8
Virtual Private Networks (VPNs) connect your device securely over the internet to another network, giving your device added security and privacy when compared to just connecting to an unknown network. This added security layer lets you safely browse websites and use your apps while you're on the go. In iOS, Apple gives you the ability to use VPNs on either an iPhone or iPad. In this article, we'll show you how it all comes together to let you add, manage, and connect to your VPNs.
Requirements
For this how to, you'll need to already have a VPN service that you subscribe to or have a VPN server ready to connect to. Don't worry, if you don't have a VPN handy, you can check out the following services:
If you have your own server, then you can roll your own VPN and use a server application like OpenVPN.
VPN apps
Many VPN services (like Cloak, and even the roll-your-own OpenVPN) give you the option to download an application from the App Store to more easily create your VPN settings in iOS. These apps have been vetted by Apple and help you configure what can be a lengthy process, depending on the type of VPN that you're trying to connect with.
We use the OpenVPN app for iOS and, while it's not pretty, it gets the job done (Figure A), properly configuring the iOS device based on the OpenVPN login information.
Figure A

The OpenVPN application prompts you for your login details, and then can connect to your server without digging through the iOS settings.
If you're using a VPN app to connect to your VPN server, there's one thing to note: While the application creates your settings in iOS so that the connection can be utilized, you'll most likely have to connect to the VPN server using the VPN app that you downloaded. This is just something to keep in mind if you try to connect to the VPN through iOS settings, and it tells you to open the app to connect instead.
Manually adding connections
If your particular service does not give you an app to more easily add the connection, you're still in luck: iOS gives you the ability to manually add your connection information.
iOS supports the L2TP, PPTP, and IPSec VPN connection protocols. Be sure to find out from your VPN service provider or network administrator which protocol your VPN uses.
To begin filling in your VPN account details, perform these steps:
Open Settings
Navigate to General | VPN
Select the button for "Add VPN Configuration..."
Select the protocol required by your server: L2TP, PPTP, or IPSec
Enter the required information, along with a description so that you can tell which VPN you're connected to
Before tapping the Save button, ensure that "Send All Traffic" switch is turned ON if, when connected to a VPN, you want iOS to send all of your web, app, and OS traffic through the VPN connection instead of through the open network that you're currently connected to over Wi-Fi or cellular (Figure B).
Figure B
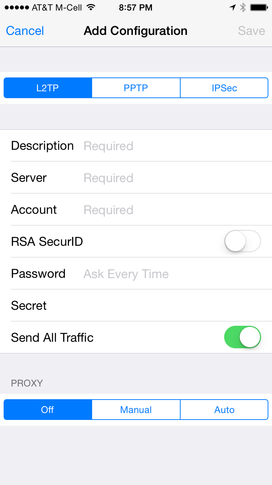
When adding a VPN connection, you'll need to know all of the server information for the VPN server you're connecting to.
When you tap Save, the VPN connection will be added. Browse all of the VPN connections by navigating to Settings | General | VPN. If you have multiple VPN connections, they'll all be listed, and you can set the default one by tapping one of the connections in the listing.
Connecting to the VPN
You can easily connect to the default VPN by navigating to the Settings app. Once a VPN connection has been added, you'll see a new VPN option. Toggle the switch to ON, and the VPN will immediately start connecting (Figure C).
Figure C

The VPN option appears in Settings after a VPN connection has been configured.
If you used a VPN service app to set up the connection, you might be prompted to open that app to connect instead.
Once connected, a VPN icon will appear in the status bar of your iOS device (near the time) to indicate that you're currently connected to a VPN server.
What VPN service do you use and recommend for iOS? Share your experience in the discussion thread below.
